The Traxbean RFID Reader is a high-performance, multi-frequency, and scalable 2.45GHz active reader designed for long-range identification and high sensitivity. It features a one-piece structure with directional recognition and customizable external omnidirectional antennas. This reader boasts a powerful anti-collision capability, capable of identifying over 500 tags simultaneously, and a fast recognition speed suitable for tags moving at up to 200 km/h. With adjustable recognition distances from 2 to 100 meters and a flexible communication interface that supports various protocols including CAN, Bluetooth, WIFI, RJ45, 4G, and 2G, the Traxbean RFID reader is adaptable to various network environments. It also supports RSSI for signal strength indication and offers flexible power options, such as adapter or POE
// RFID reader configuration
Step 1
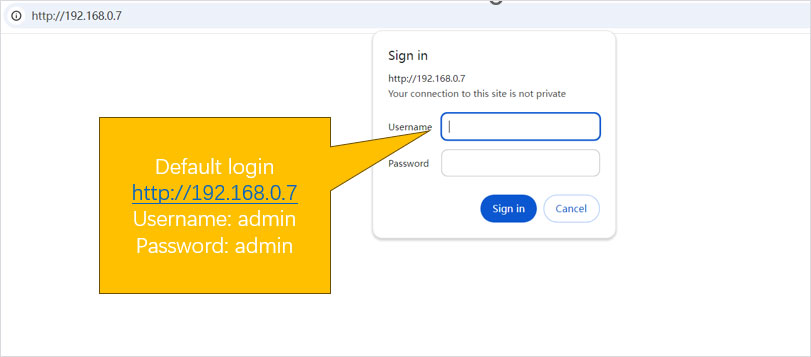
The first step is to power the RFID Reader and connect it to your local network via an Ethernet cable. Then, open the configuration URL of the RFID reader using a web browser. The default configuration URL is 192.168.0.7. Since each RFID reader has the same default URL, you will need to configure them one by one. In the configuration interface, you can change the local IP of the current RFID reader. If you have forgotten the local IP of a particular RFID reader and wish to change its settings, you can find two white wires on the device. By shorting these wires together for more than 5 seconds, all configurations will be reset, allowing you to start setting it up again. These two white wires are safe and pose no risk of electric shock.
// RFID reader configuration
Step 2
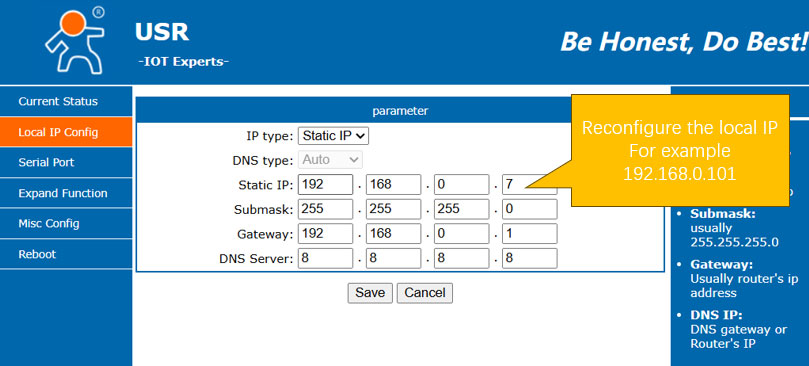
The second step is to change the local IP of the RFID reader. As shown in the diagram on the right, follow the instructions to modify the local IP. We recommend marking the device after you have set it up so that you can remember the local IP for future configuration changes. After logging in, you can also change the login username and password for the device. The default username and password are admin/admin. For projects with higher security requirements, we strongly advise changing the username and password to enhance security.
// RFID reader configuration
Step 3
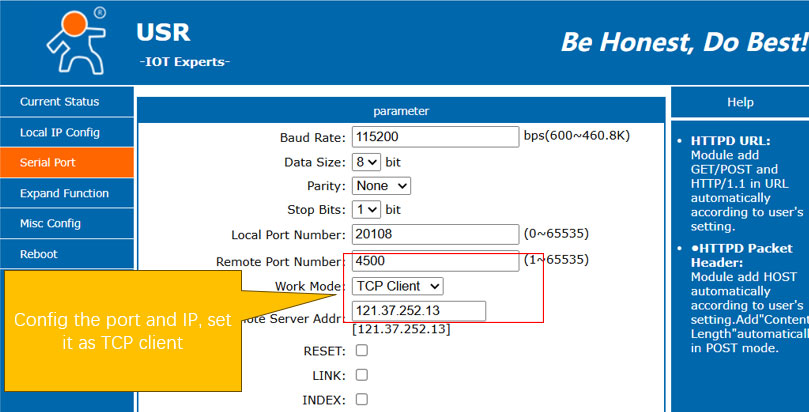
The third step involves configuring the server information, which is the destination where you want the RFID reader to send its data. There are three pieces of information that need to be set up: the Work mode, the port, and the IP address. As shown in the diagram, you should set the Work mode to TCP client. Additionally, you will need to specify the port number and the IP address of the server. The device also supports UDP protocol, offering flexibility in data transmission methods.
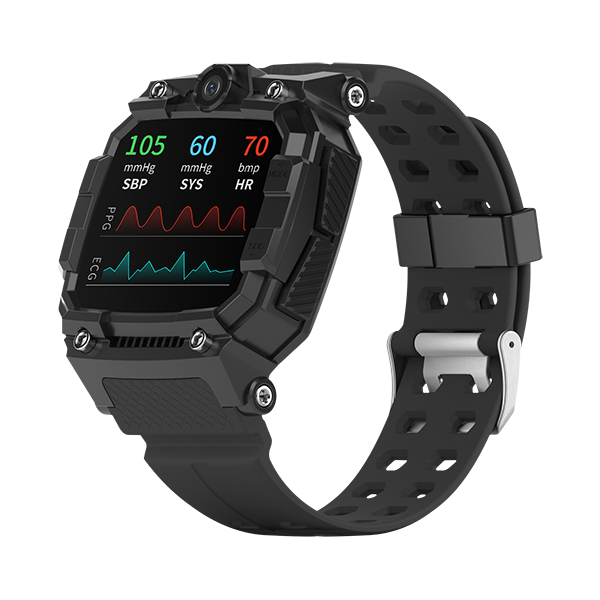
ThinkRace, a leading manufacturer, specializes in comprehensive electronic monitoring solutions for the justice industry. We offer a range of products, including electronic restraints and smartwatches, designed to cater to the needs of offenders, law enforcement officers, and command personnel. Our hardware and software solutions are tailored to meet the critical business requirements of various stakeholders within the sector. Choose from our diverse product lineup to address your specific monitoring and security needs.